part one of this tbd series deals with starting a brand new install from scratch on pantheon, or migrating an existing site (local or remote) onto patheon. but first:
a brief foray into pantheon terminology
pantheon has three main ways of categorizing your wordpress build. two make sense.
code: your entire file structure of your wordpress directory. basically everything except the database. oh, and, somewhat inexplicably, without the uploads* folder. you’ll need it, but i’ll get to that.
*located at wp-content/uploads
database: er, yeah, the database, in the form of an SQL dump.
files: here’s where it gets a little weird. for reasons that my cursory googling could only partially figure out (storage, size reasons), pantheon keeps everything normally in an uploads folder in a separate root directory called “files”. so that’s a thing.
in this guide:
- setting up a brand new build
- migrating from local/other remote
- setting up your local MAMP environment
setting up a new site – the easiest
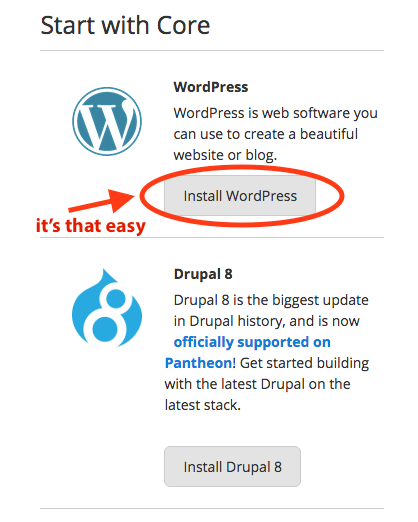
if you’re setting up a shiny new wordpress site, no problem – pantheon’s got that covered. it will install wordpress for you! when you get into your account and click “Create your first site”, if you scroll down past the migration options to “Start with Core” there’s a handy button to one-click install your new blog. then just follow pantheon’s instructions. hooray!
i need to migrate from another host and/or locally from MAMP – now what?
okay, i hear you. MAMP (or WAMP for those more windows-inclined) is incredibly helpful and it’s nice to be able to instantly and locally see your changes – and develop without a connection. but what if you now want to migrate to a dev address?
similarly, what if you already have a blog set up on another server or hosting provider and just want to move it?
the pathway here is slightly less clear. pantheon has some instructions, but if that is slightly confusing, i will go through my own approaches below, in increasing order of difficulty.
p.s. step 1 is always make sure your wordpress is up to date. pantheon’s instructions mention this an inordinate amount of times before actually getting to the directions you need, so it must be kind of important.
approach 1: duplicator
use this if: your site is less than 100MB total, all in
 Duplicator is an immensely useful wordpress plugin that neatly packages your entire site and is pretty darn easy to use. just install and follow the instructions to get your nicely compressed file all ready for pantheon. note that you just need the archive download, not the installer (duplicator automatically gives you both when it finishes a package build).
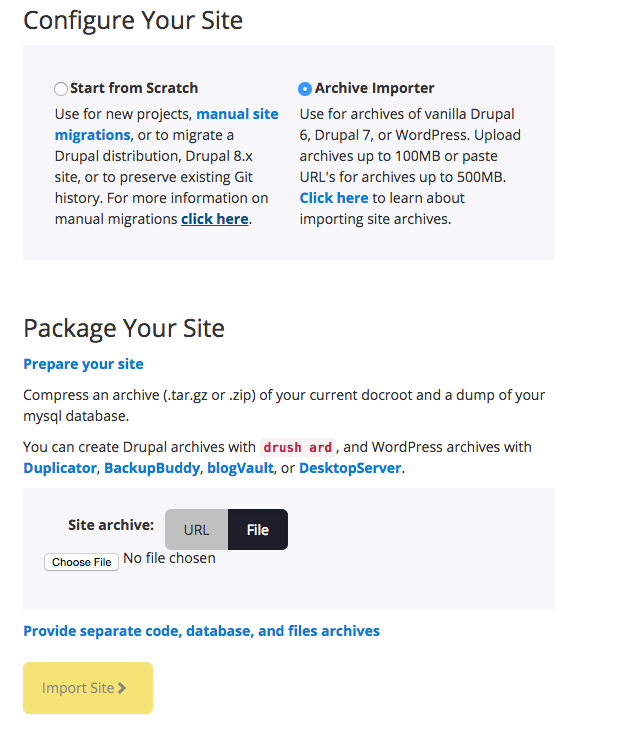
you can then import using pantheon’s importer tool in one fell swoop. no need to deal with all of this code/database/files stuff. wait for it to say your file was uploaded (the progress bar may or may not actually do anything), and then click “Import Site”. again, pretty easy.
edit: it has also been pointed out to me that if your duplicator archive is over 100MB but less than 500MB, head on over to approach 3: dropbox-ing it.
approach 2: split into “the three” (code, database, files)
use this if: your site is between 100MB and 300MB and each of the code, database, and files archives are under 100MB.
alternatively, if duplicator doesn’t work and the above are still true.
you’ll need access to your database and file structure.
get the code:
if you are getting files from another server and have access to FTP or sFTP, fantastic! go right ahead and download everything from your root wordpress directory; i recommend using a nice FTP client like Filezilla (this may take a while).
pantheon’s command-line heavy instructions on this other page then direct you to take out the uploads folder at this point, plus anything else you don’t want tracked in Git — but don’t toss the folder! you’ll need to upload it separately as another archive and presumably it’s taking up a lot of space. remember, you only have 100MB. keep your uploads folder safe in another location, we’ll come back to it in a sec.
once you’ve successfully extracted the uploads, just zip ‘er on up into an archive file.
if you’re using MAMP, even easier! you already have the files on your computer so you can just pull out the uploads folder and archive away!
get the database:
if you’re using phpmyadmin (usually available in your host’s cPanel), just export the entire database that holds your wordpress table data using the export tab (you’ll want it as a .sql file).
MAMP also comes with access to phpmyadmin through the WebStart page. with MAMP, though, if you want to feel like a ninja, you can also navigate to the included mysqldump CLI on the command line (thanks, stack overflow). the needed command for a mac is as follows, all one line, all in one go:
/Applications/MAMP/Library/bin/mysqldump -uroot -proot --opt yourdb > yourdump.sql
this will dump the file in your computer’s root directory. you can rename yourdump.sql something a bit more applicable to your database if you’d like, but you’ll HAVE to switch ‘yourdb’ to the name of the applicable database. the path is weird compared to where you’ll find other CLI programs because MAMP hides all of theirs in the actual applications folder. don’t you feel cool now?
get the files:
remember the uploads folder you set aside when you were getting the code? great. zip that into it’s own archive and you’re set.
import to pantheon
now that you have your three archived files of under 100MB each, head on over to pantheon and again select the “Archive Importer” option. then, way at the bottom directly above the “Import Site” giant yellow button, select the “Provide separate code, database, and files archives” link. then hit upload and cross your fingers for success.
approach 3: dropbox or other remote URLs
use this if: you want to try something i haven’t and your site is between 300MB and 1.5GB and each of the code, database, and files archives are under 500MB each
i haven’t actually tried this method, but if you have a backup bigger than 300MB but smaller than 1.5GB (500MB + 500MB + 500MB), you can apparently have these files live on dropbox/amazon/your other server/etc and throw in the URLs. pantheon has very limited looking instructions on their Migrate Sites to Pantheon guide or all the way at the bottom of the Export an Existing WordPress Site.
approach 4: three files + command line + git + sFTP
use this if: you have a really big wordpress site. over 1.5GB total or a database larger than 500GB. or you have a site smaller than the max size but pantheon still hangs when trying to import it, you know, speaking from experience, if that should happen to you. or if you just really like command line.
code
first, you’ll want to add all code (no wp-content/uploads – hide it outside of your repo for now or add it to .gitignore at the outset) to the pantheon remote repo (automatically set up when you create a new site). don’t worry about changing any URLs yet – we can get to that later.
note that you’ll have to have your files git tracked already, without a remote repo. to install git locally on your repo, follow steps 2 to 6 on github’s guide to adding to a remote repo. then, you’ll want to find your Git SSH clone URL, which is the first input field under the connection settings on the pantheon dashboard. copy this field starting at the ssh:// (ignore ‘git clone’) and without the database name at the end (it should just end in ‘.git’):

then, add that repo link as the remote origin for your local repo and verify it with these commands, (after making sure you’re in the right local directory):
git remote add origin pantheon-ssh-url-here

git remote -v
finally, push all of your local code to the pantheon remote. it will ask you if you want to do this. type yes, press enter, and put in your pantheon account password to authenticate:
git push origin master
hooray! your code now in pantheon. you can quickly check this by visiting your dashboard – it should hold your commit history (if you started a new repo, this will only have one commit).
if you ran into any merge problems with that push, try resolving with “theirs” (i.e. pantheon’s code).
as per usual, there’s a catch – you’ll need to create or overwrite an existing wp-config.php file with pantheon’s wp-config file. just copy and paste the code on their site into a text editor, save it as wp-config.php, and paste/overwrite into the wordpress root directory.
files
find your wp-content/uploads folder. pantheon provides command line sFTP instructions, but i would recommend using a client like Filezilla for this. you can get all of the connection information from the connection info panel under “SFTP”. once connected, proceed to place the contents of the wp-content/uploads folder into the ‘files’ folder in your pantheon site’s root directory.
database
for this step, you’ll need to install the mysql cli if you haven’t already (if you’re using MAMP, it’s included – look for MAMP instructions below).
then, navigate to the directory that holds your database .sql file (made through mysqldump or export via phpmyadmin). you’ll also need to go to the pantheon dashboard and copy the entire database command under Connection Settings > Database > Command Line. it will look something like this, and make sure you’re issuing a program call and not already in the console:
mysql -u pantheon -pPassword-jumble -h dbserver.dev.site-id-here.drush.in -P site-port-here database-name
paste this into the command line, but before hitting enter, add the database file name information:
mysql -u pantheon -pPassword-jumble -h dbserver.dev.site-id-here.drush.in -P site-port-here database-name < yourdatabase-name.sql
then hit enter.
if you’re using MAMP, this will be slightly different. MAMP makes it easy because you don’t have to install mysql – MAMP already did that for you and turning on MAMP will turn on the MySQL server.
therefore, you just need to navigate to the folder and issue the program call all in the same line:
/Applications/MAMP/Library/bin/mysql -u pantheon -pPassword-jumble -h dbserver.dev.site-id-here.drush.in -P site-port-here database-name < yourdatabase-name.sql
but wait, there’s more!
so you imported all of your files, but you notice your site still doesn’t work. that’s because your database is still looking for the URL strings from your local environment. luckily, pantheon has an easy specialized way of fixing that for you.
pantheon has its own CLI called Terminus. i have so far only used it to run a search-replace, but apparently it can do a bunch of things. install it using one of the suggestions on their repo docs; i used cURL so i didn’t have to install any new things (developers are lazy sometimes).
you’ll have to authenticate terminus each time you open a new terminal window by using
terminus auth login
it will give you some authentication options – if you want to permanently authenticate your machine, follow the instructions for machine tokens. if you’d rather use your pantheon password or are on a shared computer, use the username and password authentication options instead.
you will also need to install the wordpress cli called WP-CLI. (i used cURL here too.) you will use the two CLIs together to search-replace.
to perform a search-replace on your whole pantheon setup, use this handy command:
if you’re lucky, that’s all you need to do. if you’re unlucky need a challenge, your terminal will reject this command and tell you something along the lines of a “URL redirect warning with Backtrace” or something. hiding in the error output is the (hopefully) real cause of the error: a plugin! figure out the name of the plugin that is causing issues and try this gist instead (i wrote it out so you won’t have to scour the internets like some people).
and now you should be ready to go and your dev site should be up and running! cross your fingers. give yourself a high five.
setting up wp-config-local.php
okay, so you’ve gotten everything set up in pantheon. great!
…oh, wait, you still want to develop locally with MAMP? oh, well, alright.
you may notice if you’ve peeked into the wp-config file from pantheon that it contains a bunch of illegible strings to make sure that your database is secure. that’s great and everything, but that means that to run locally, you’ll have to include your own config.
pantheon has helpfully thought of this and added a line in their wp-config for you to access a local file if you so desire:
/**
 * Local configuration information.
 *
 * If you are working in a local/desktop development environment and want to
 * keep your config separate, we recommend using a 'wp-config-local.php' file,
 * which you should also make sure you .gitignore.
 */
if (file_exists(dirname(__FILE__) . '/wp-config-local.php') && !isset($_ENV['PANTHEON_ENVIRONMENT'])):
 # IMPORTANT: ensure your local config does not include wp-settings.php
 require_once(dirname(__FILE__) . '/wp-config-local.php');
this means if the file wp-config-local.php exists, then it will use that and skip all of this pantheon garble. careful, though – since you’re simply going to give your local environment the pantheon connection settings, you’ll want to add wp-config-local.php to our .gitignore so that it doesn’t get saved into source control. pantheon has done such a good job with security, so it’s nice to keep that trend going!
while you’re at it, you’ll also want to add .htaccess to the gitignore along with a bunch of other files that shouldn’t or don’t need to be tracked.
open the local file while you’re in the root directory with
open .gitignore
then add
# WordPress #
############
wp-config-local.php
wp-content/blogs.dir/
wp-content/upgrade/
wp-content/backup-db/
wp-content/advanced-cache.php
wp-content/wp-cache-config.php
sitemap.xml
sitemap.xml.gz
*.log
.htaccess

# @TODO writable paths
wp-content/cache/
wp-content/backups/


# Packages #
############
*.7z
*.dmg
*.gz
*.bz2
*.iso
*.jar
*.rar
*.tar
*.zip
*.tgz

# Logs and databases #
######################
*.log
*.sql

# OS generated files #
######################
.DS_Store*
ehthumbs.db
Icon?
Thumbs.db
._*

# Vim generated files #
######################
*.un~

# SASS #
##########
.sass-cache

# BOWER or GRUNT #
##################
node_modules
bower_components
.tmp

web.config
to the file. then save.
once that is complete, all you need in wp-config-local.php is as follows:
<?php
define('DB_NAME', 'pantheon');
define('DB_USER', 'pantheon');
define('DB_PASSWORD', 'pantheon-password');
define('DB_HOST', 'pantheon-password:pantheon-port-#');
define('WP_HOME', 'http://andreakereliuk.com/');
define('WP_SITEURL', 'http://andreakereliuk.com/');
?>
//all settings are found in pantheon's connectivity settings tab under Database.
//if you have your local environment set up in a subfolder, make sure that subfolder is appended to http://andreakereliuk.com/subfolder-here
then save this file in the same root directory as wp-config.php.
done, finally! (i think).
if you are still troubleshooting locally after completing the above steps, try checking out your .htaccess file in the root directory (open it the same way you would open .gitignore). if the rewrite rule url’s don’t match your local environment, then wordpress won’t know how to create its site URLs. the local .htaccess should look something like this (use the applicable code block):
## IF USING ROOT DOMAIN USE THIS
# BEGIN WordPress
<IfModule mod_rewrite.c>
RewriteEngine On
RewriteBase /
RewriteRule ^index\.php$ - [L]
RewriteCond %{REQUEST_FILENAME} !-f
RewriteCond %{REQUEST_FILENAME} !-d
RewriteRule . /index.php [L]
</IfModule>
# END WordPress

## IF USING SUBDOMAIN USE THIS
# BEGIN WordPress
<IfModule mod_rewrite.c>
RewriteEngine On
RewriteBase /subdomain-name/
RewriteRule ^index\.php$ - [L]
RewriteCond %{REQUEST_FILENAME} !-f
RewriteCond %{REQUEST_FILENAME} !-d
RewriteRule . /subdomain-name/index.php [L]
</IfModule>
# END WordPress
if you are working through this and need any help, feel free to reach out to my twitter account or email. similarly, if i made any mistakes or something doesn’t work, please let me know! it will save me the next time i use pantheon as well.
stay tuned for parts 2 and 3 of this series: developing on pantheon’s environments, and exporting to a new host.
happy coding!
Thanks for the write-up!
Just one point: you can combine droboxing big archives and the Duplicator route to handle one bigger archive. There are more details on all this on our docs site:
https://pantheon.io/docs/articles/sites/migrate/
If you have anything you think we should change (or include) the docs are open to community contributions:
https://github.com/pantheon-systems/documentation
thanks for the feedback! updating the post accordingly.